Published
- 11 min read
Kannel Intro: Send Your First SMS
Legal and Privacy
Be aware that:
- Sending certain types of messages may no be legal in your country
- Doing
Lab Exercisesand doing thingsfor realare two different pair of shoes - With the rise of
4G & 5Gmany of these issue are addressed, however GSM remains a huge patchwork. Results will vary - With this article we also aim at creating awareness for topics like GSM and SS7 vulnerabilities - this should concern everyone, especially knowing that everyone can potentially do it!
We’re privacy advocates by heart and helped transforming the Web to https more than a decade ago, showed customers how to communicate securely and inform on possible issues of modern communication and devices. You may not remember, but not long ago average users couldn’t see any value in secure communication. We put this information out there for protection and good use.
TL;DR for Techs
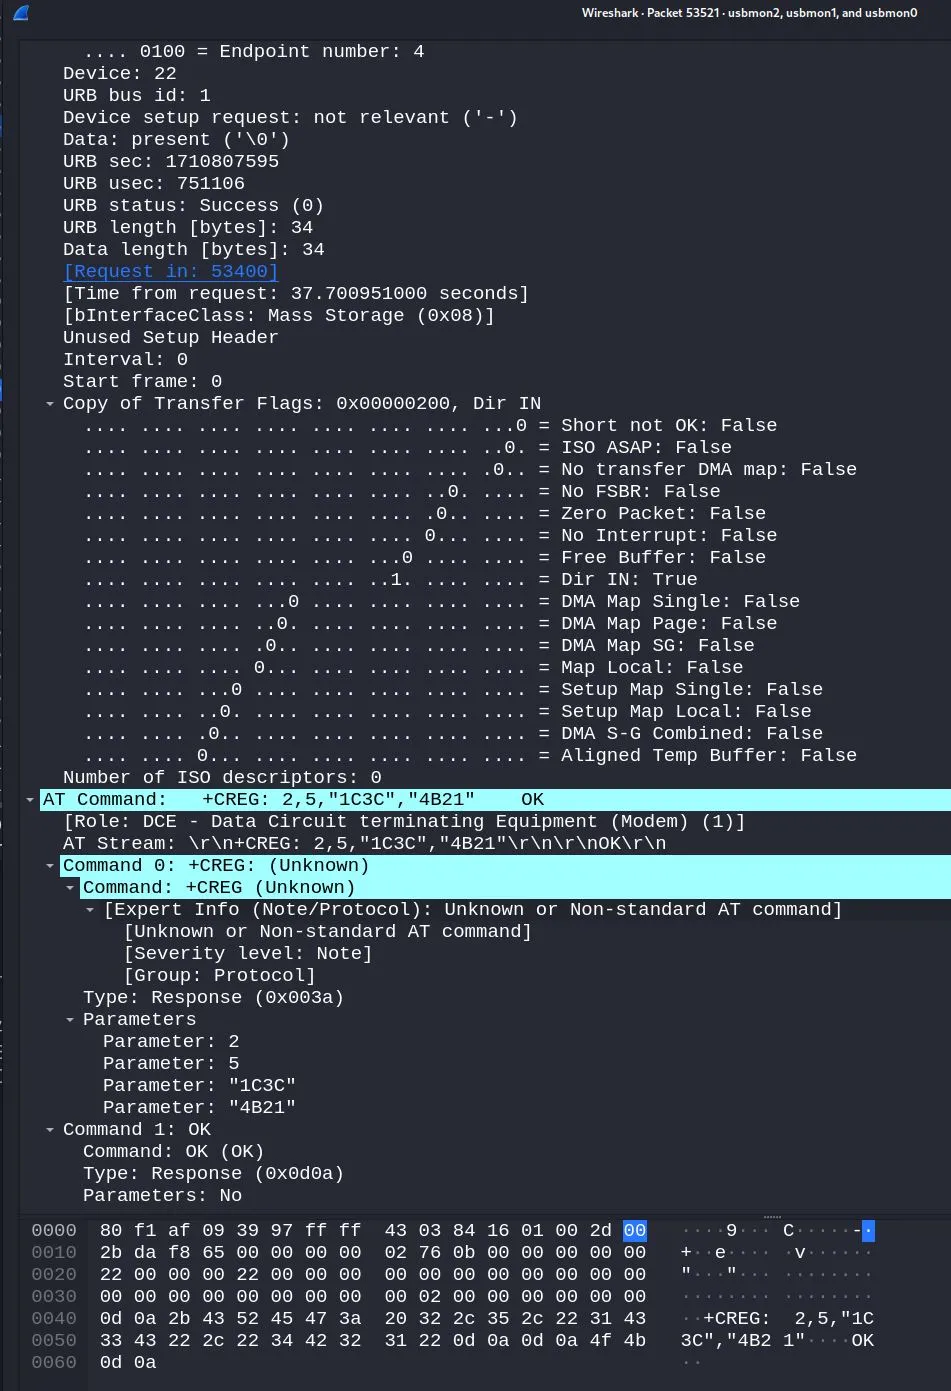
Wireshark can read the response data and extract lots of info from these unprotected protocols, independent on what you’re sending or receiving. Some of this data may contain very interesting things. Have fun.
       # https://www.wireshark.org/docs/dfref/i/isi.html
isi.gps.gsm.cid	Cell ID (CID)	Unsigned integer (16 bits)	2.2.0 to 4.2.3
isi.gps.gsm.lac	Location Area Code (LAC)	Unsigned integer (16 bits)	2.2.0 to 4.2.3

# https://www.wireshark.org/docs/dfref/c/cbsp.html
cbsp.cell_id_disc	Cell ID Discriminator	Unsigned integer (8 bits)	3.2.0 to 4.2.3
cbsp.lac	Location Area Code (LAC)	Unsigned integer (16 bits)	3.2.0 to 4.2.3

# https://www.wireshark.org/docs/dfref/g/gsm_map.html
# More possibly interesting data
Links and Learning Resources
- https://www.firstpoint-mg.com/blog/ss7-attack-guide/
- https://www.mcafee.com/blogs/mobile-security/ss7-flaw-how-hackers-abuse-it/
- https://developers.melroselabs.com/docs/sccp-hub-demo-mtu-mtr
- https://developers.melroselabs.com/docs/sccphub
- https://melroselabs.com/tools/sccphub/
- https://www.itu.int/dms_pub/itu-t/opb/sp/T-SP-Q.708B-2020-PDF-E.pdf
- https://www.itu.int/dms_pub/itu-t/opb/sp/T-SP-Q.708B-2012-PDF-E.pdf
- https://www.opencellid.org/
- https://www.kannel.org/download/1.4.5/userguide-1.4.5/userguide.html
- https://en.wikipedia.org/wiki/Mobile_Application_Part
- https://github.com/PenteSploit/ss7-attack
- https://github.com/openss7/openss7
- https://github.com/ethicalhackeragnidhra/SigPloit-ss7
Update
We had most of this published on social media, but since we left public social media space completely, here’s the pics. Eventually we didn’t really use Kannel but the CLI instead.
We left the Kannel stuff below for laziness.
In no particular order.
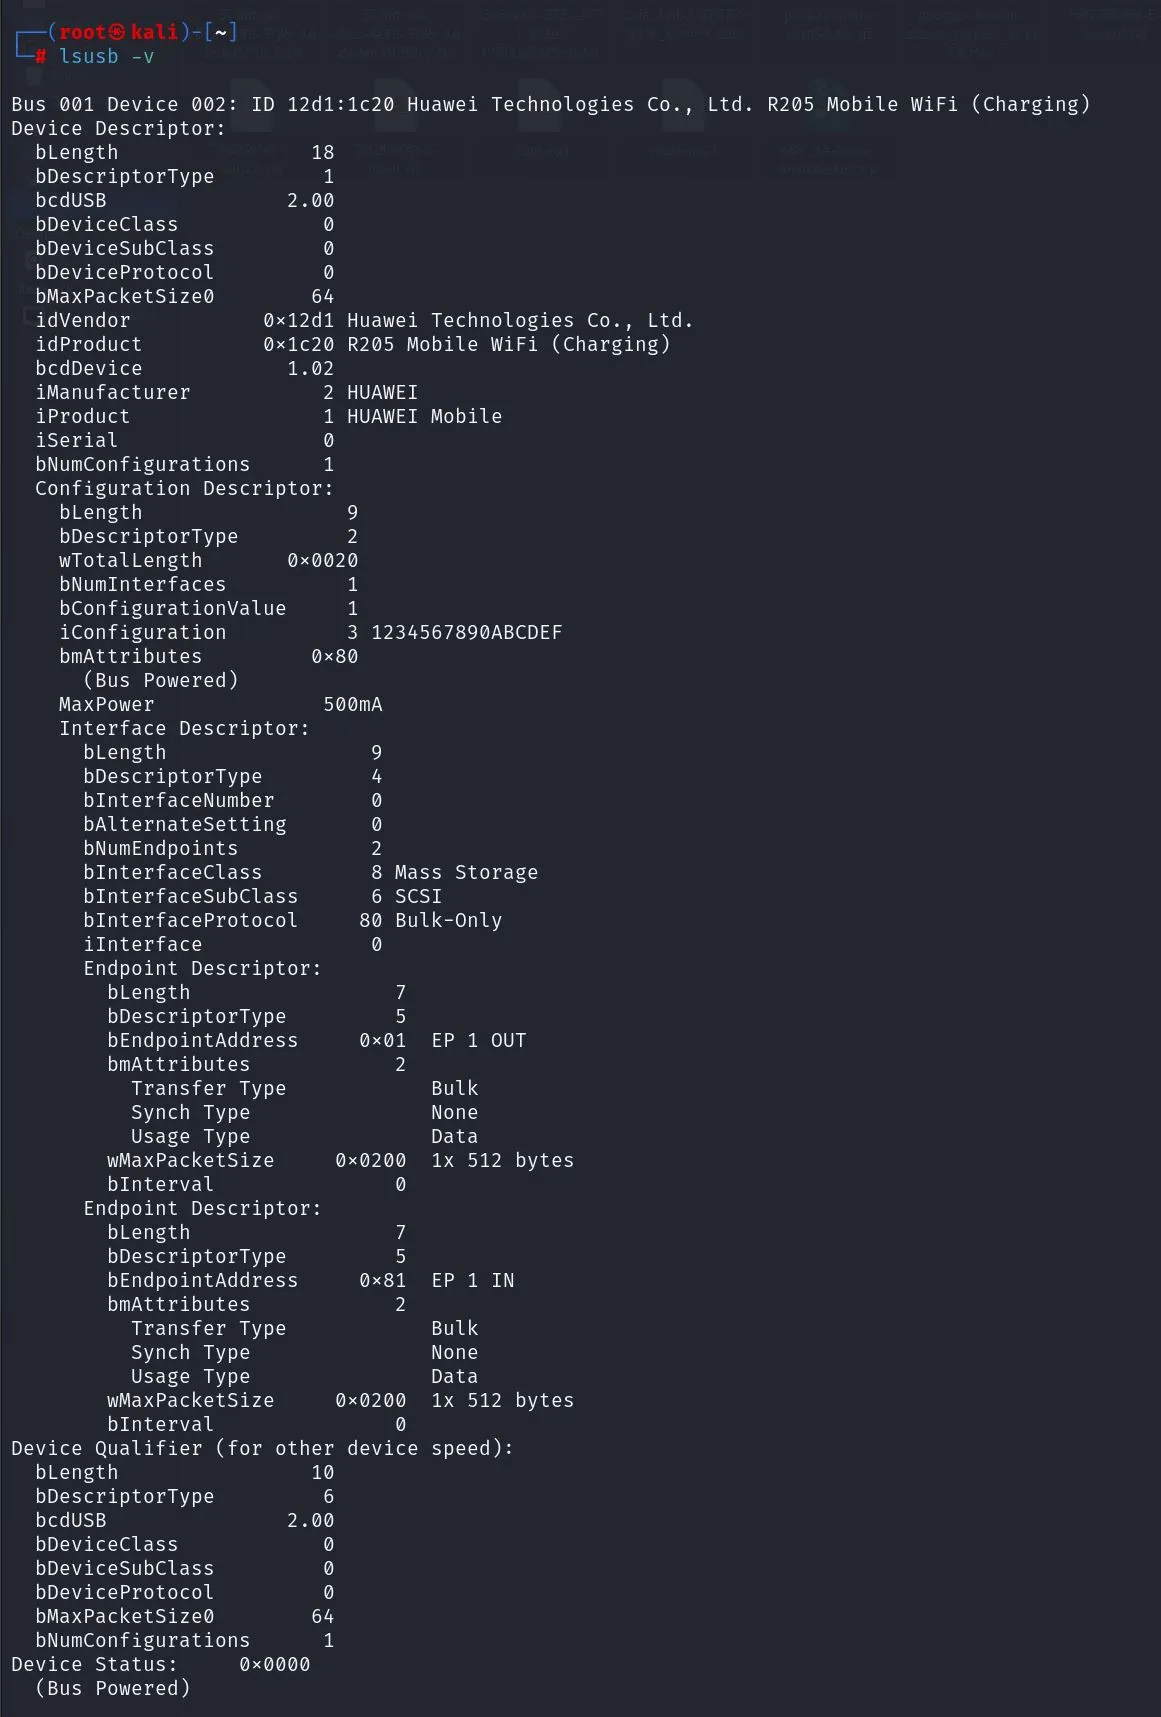
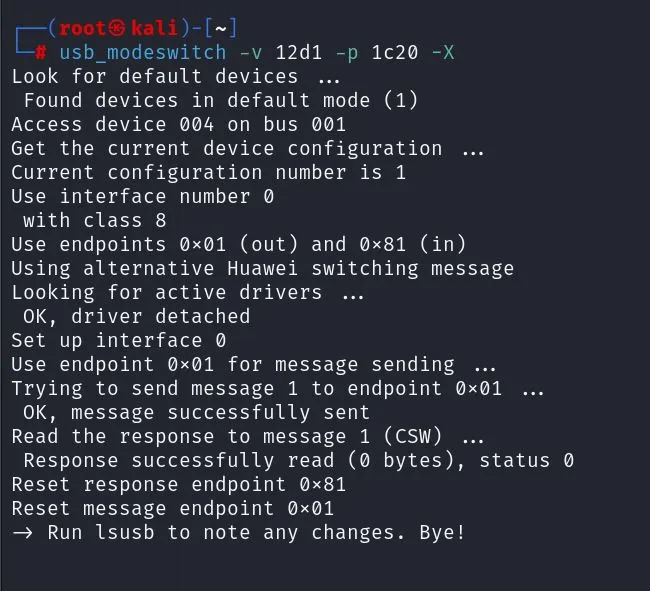
usb modem is in storage mode
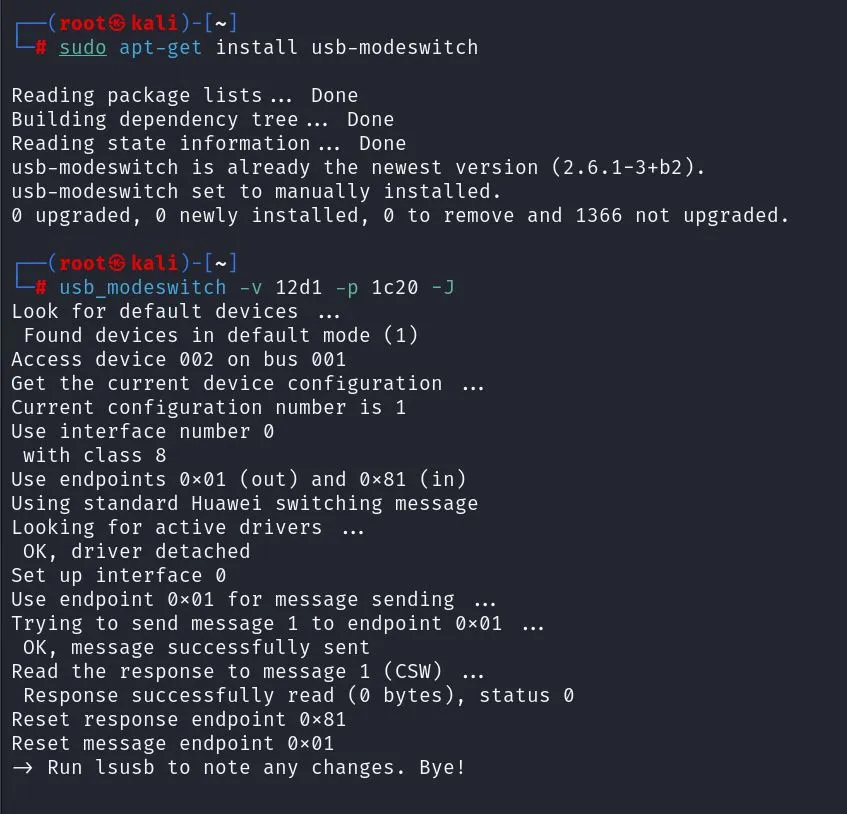
switch modem to modem mode
modprobe_helped

After modprobe usbmon and networkmanager and reconnect it worked
and after a few more attempts
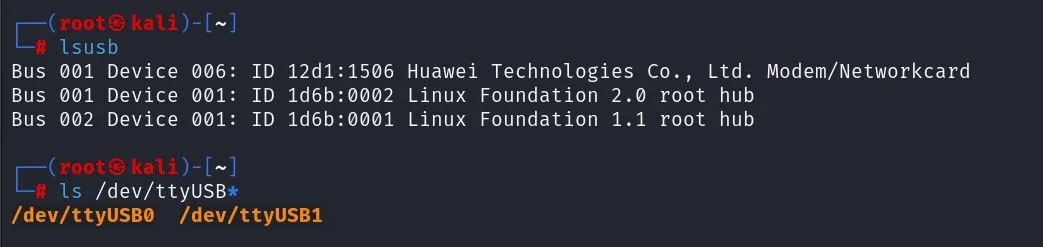
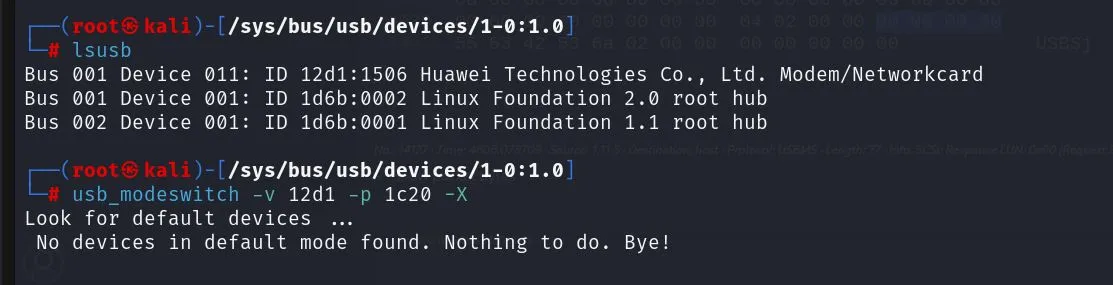
modeswitch alt success
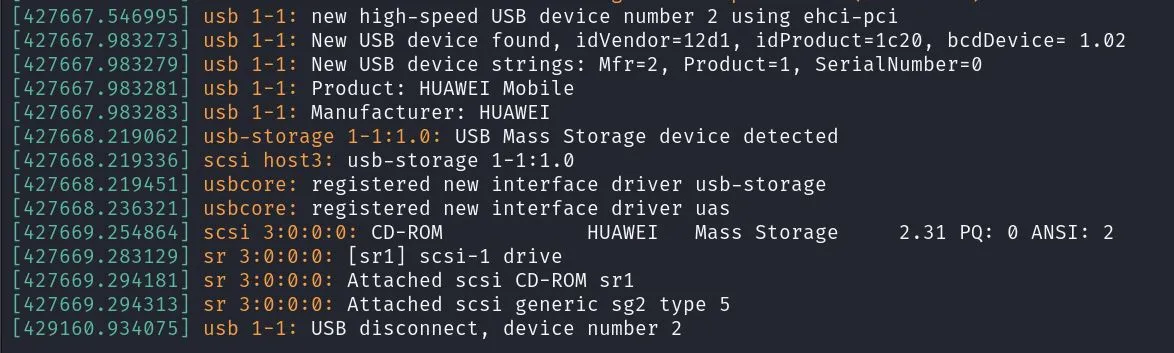
dmesg
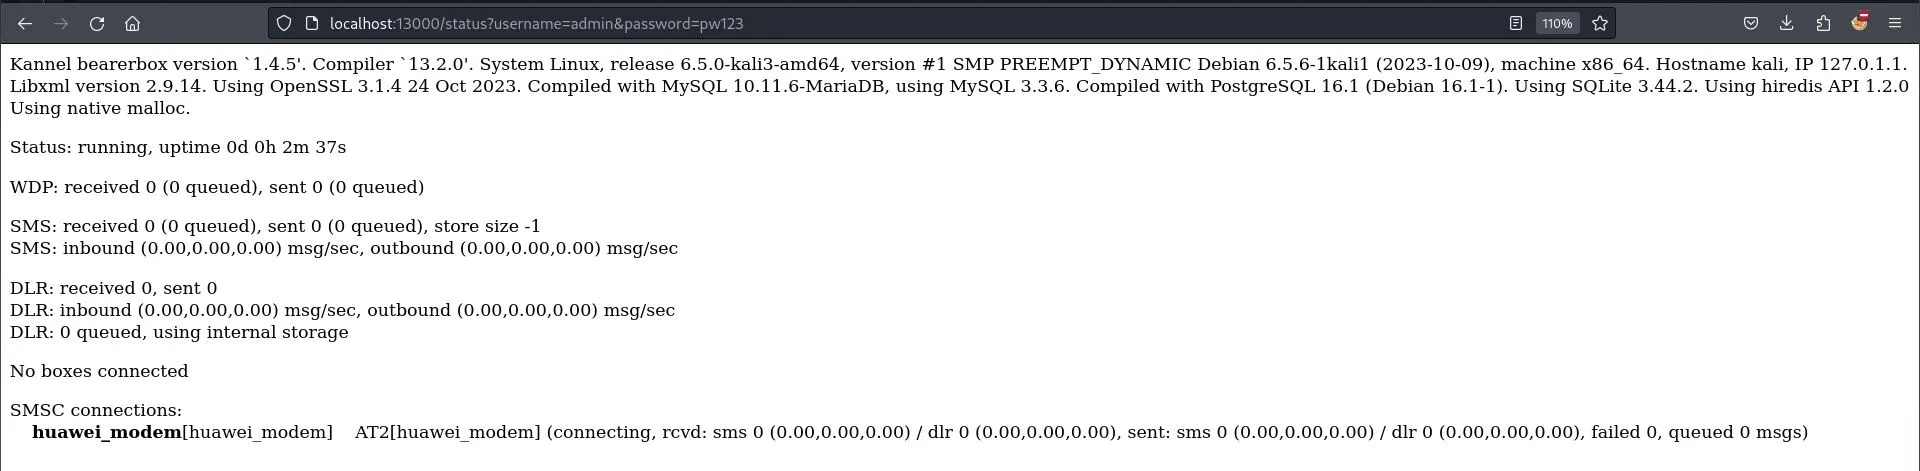
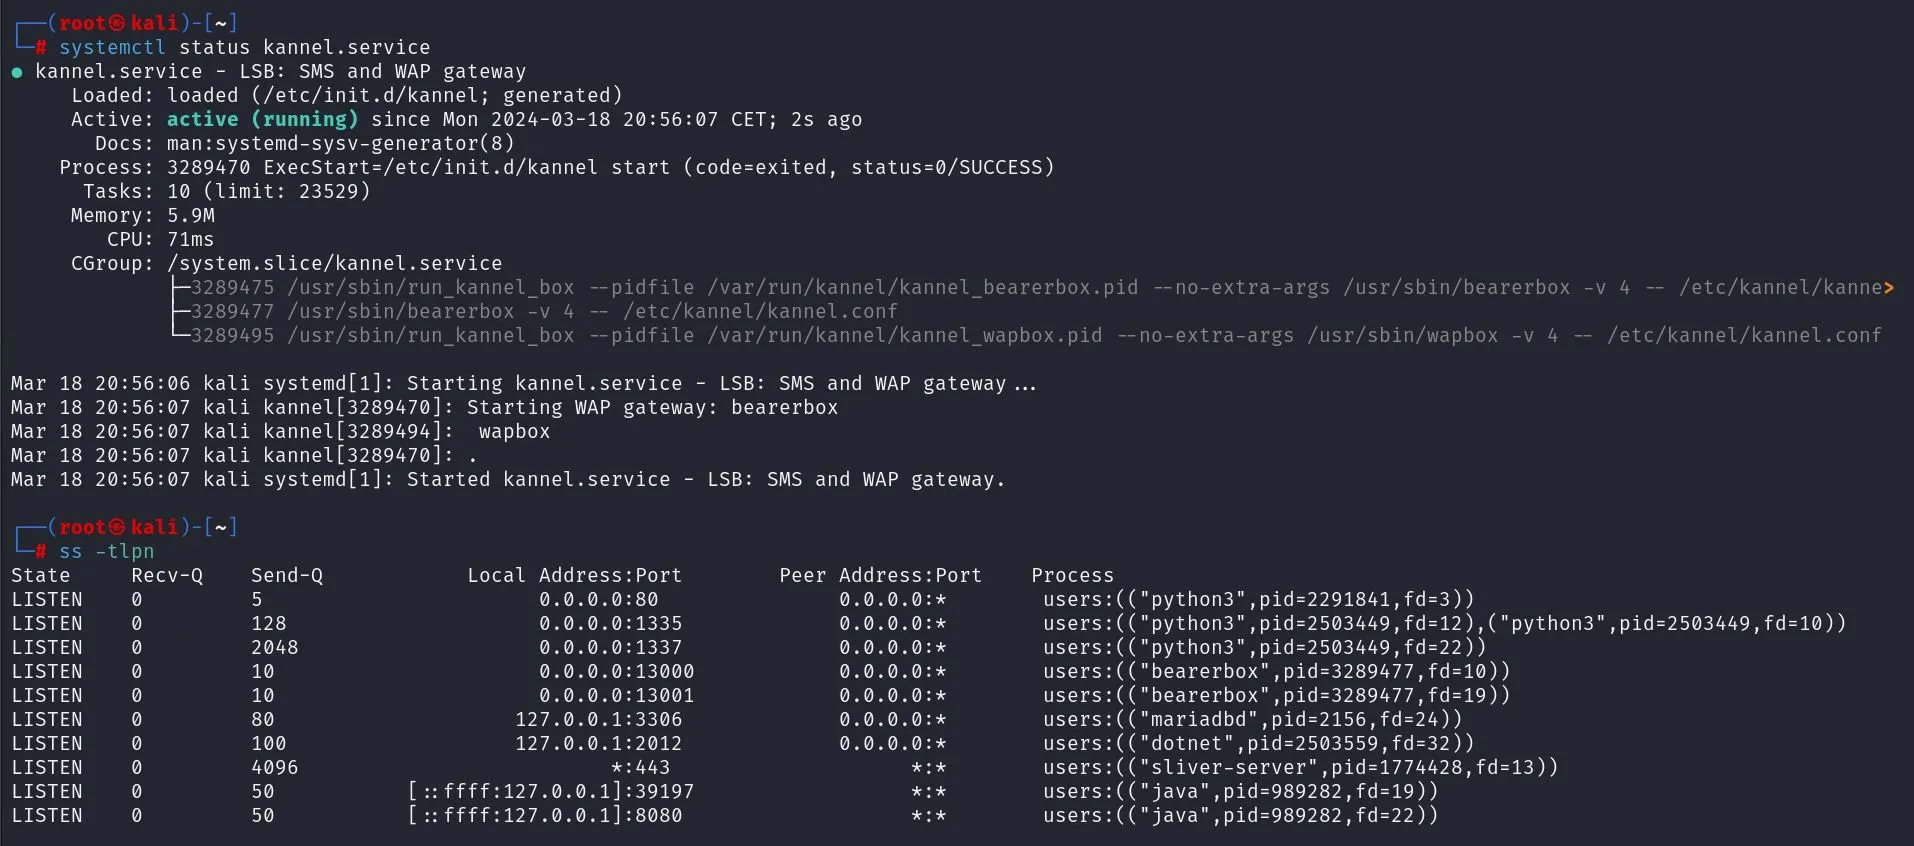
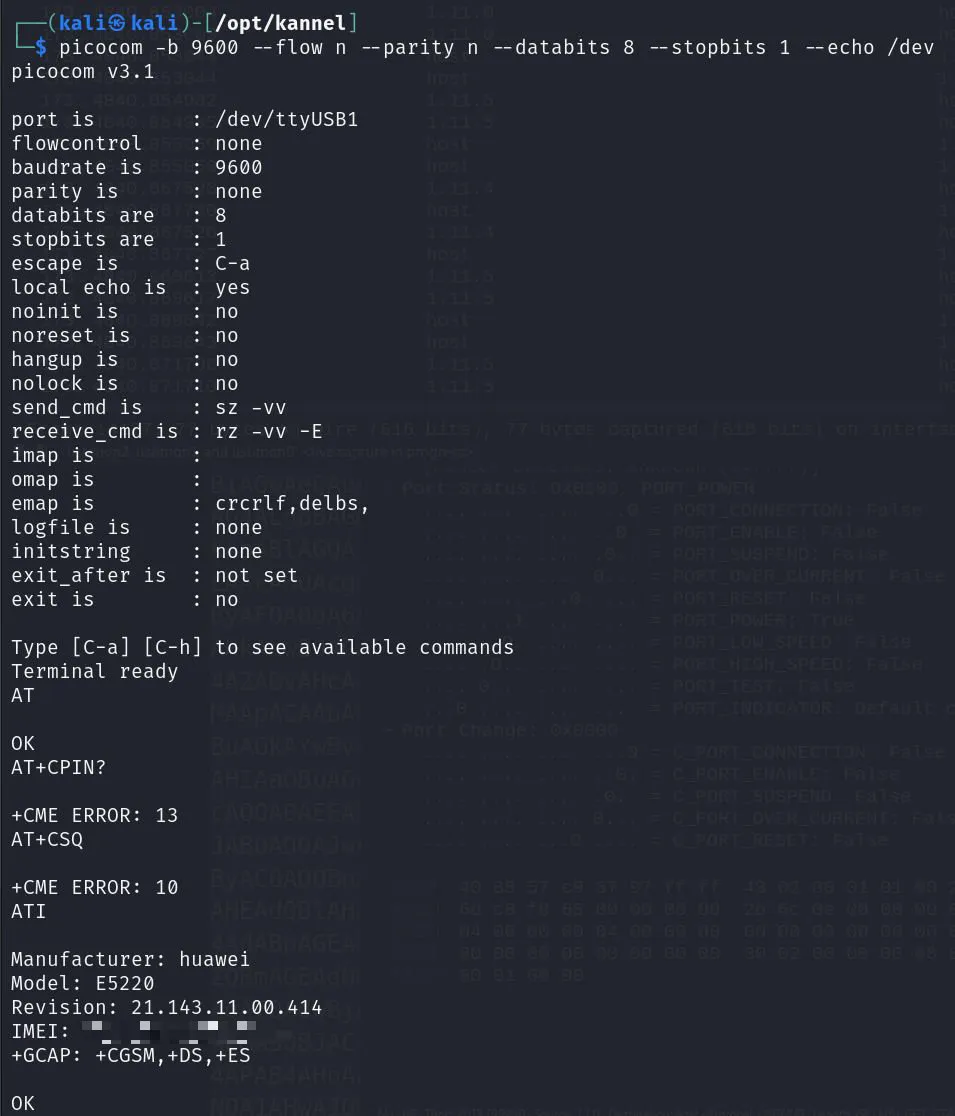
Kannel (not really used)
Picocom first responses
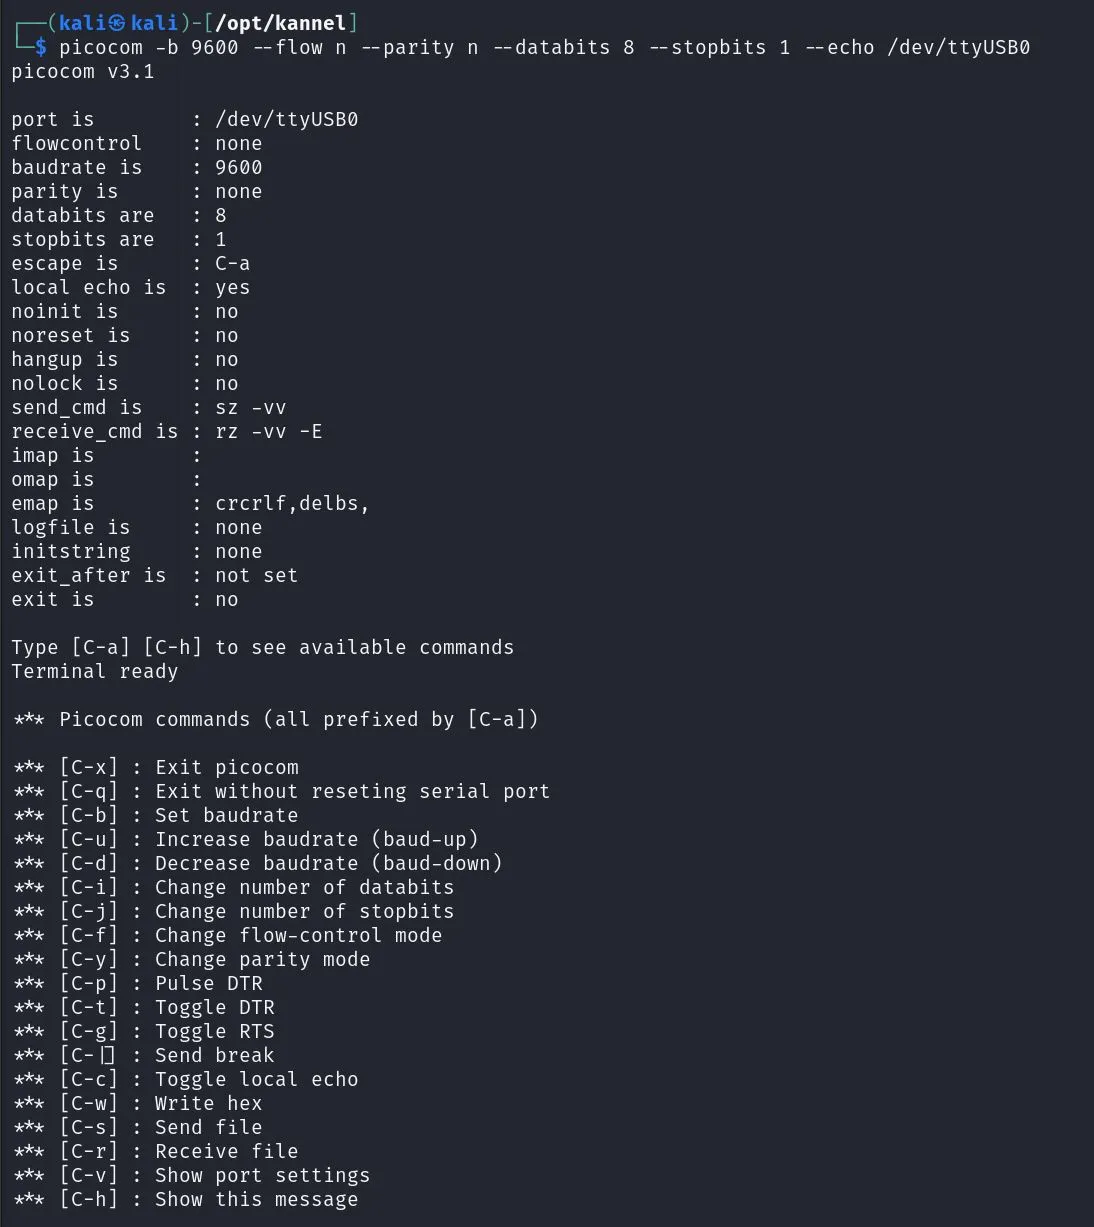
picocom ctrl a ctrl h
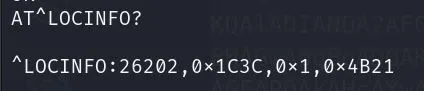
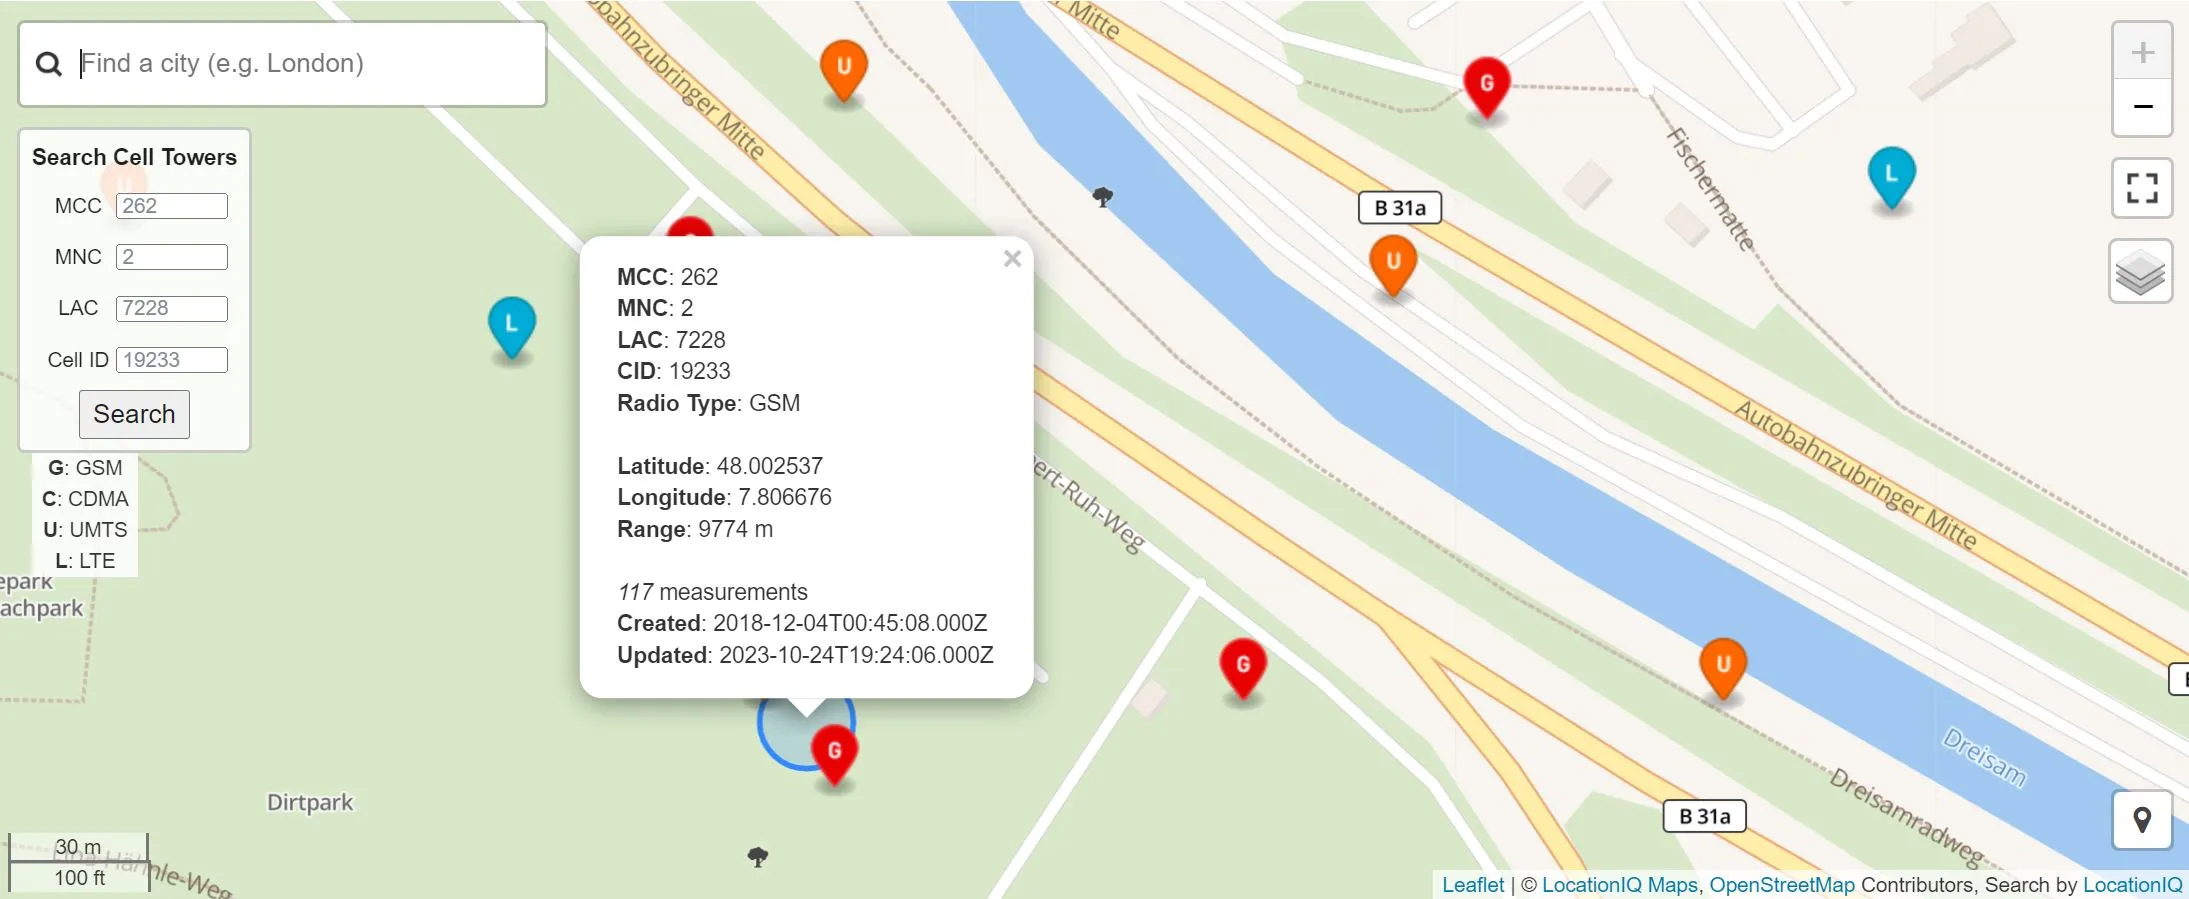
Location Info
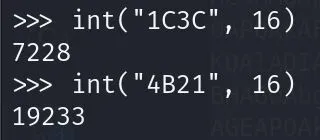
Convert CellID Hex to Int
Located Myself
Wireshark: Check Network Registration
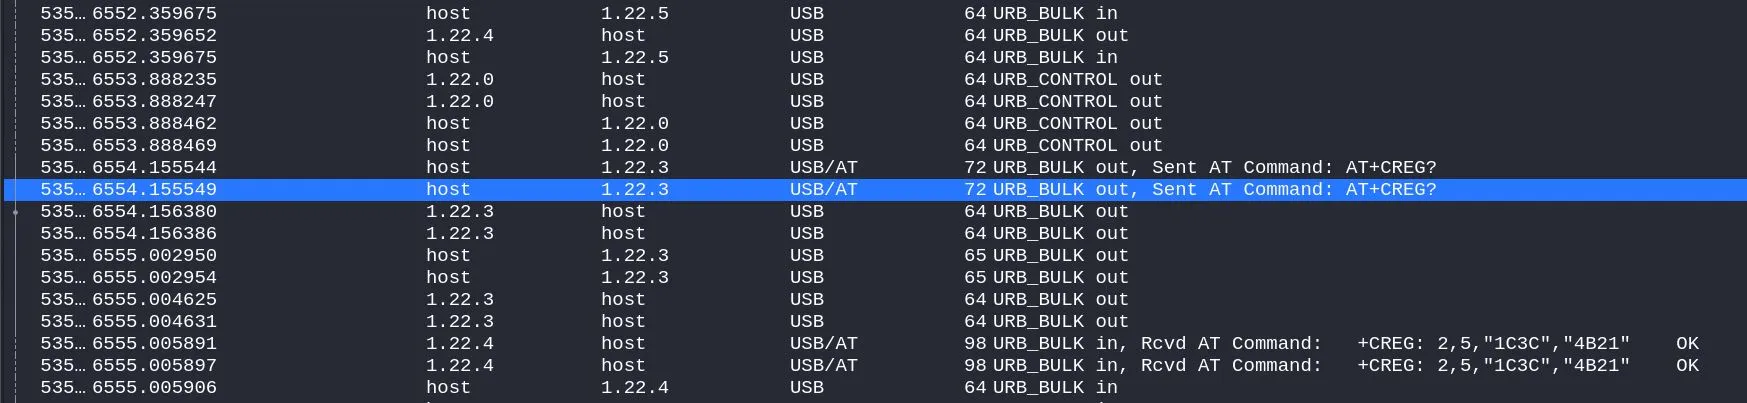
Wireshark: Check Network Registration Response
Short Conclusion
on the pics and the experiment. GSM Location Tracking seem more than plausible. However, if you want to track anyone, but yourself (silent or fake spam SMS), you need special modems that support particular AT Commands to send SMS - the protocol itself can deliver the location info of the recipient. As we didn’t want to encourage or support this kind of surveillance, and also had no money to buy other modems, we left it there. It’s definitely a fun topic for a lab weekend.
What we found, about protocol updates like “4G” / “5G”, that at least 1/3 of the towers are “3G” and it will likely stay that way for a few more years. Even with modern hardware, chances to hit a 3G tower are high.
Part 1: Setting Up Kannel for sending SMS
Embarking on the journey to set up a powerful, open-source SMS and WAP gateway with Kannel, we aim to harness its robust capabilities for sending SMS messages. Kannel, celebrated for its active maintenance by a passionate developer community, evokes a nostalgic charm with its straightforward, efficient design. Let’s dive into the setup process.
Getting Started with Kannel
1. Fetching Kannel: To lay the groundwork, start by visiting Kannel’s official website to download the latest version. The daily snapshots are your go-to resource for the freshest code, alongside invaluable documentation to guide you through the setup.
2. Installing Dependencies: Kannel demands a solid foundation of dependencies. On a Debian-based system, prepare your environment with the following command:
$ sudo apt-get install build-essential libssl-dev libcurl4-openssl-dev libdbi-dev libpcre3-dev libspeex-dev libspeexdsp-dev libgsm1-dev libasound2-dev libusb-dev libsctp-dev libqmi-dev libgps-dev libgoogle-glog-dev libopencv-dev libgcrypt20-dev libgnutls28-dev libmysqlclient-dev libpq-dev libradcli-dev libsctp-dev libspandsp-dev libtalloc-dev libvorbis-dev libxslt1-dev libyaml-dev portaudio19-dev python-dev python-pip python-setuptools python-twisted-bin python-zope.interface swig unixodbc-dev3. Preparing Kannel for Installation: With dependencies in place, extract Kannel into your desired directory and prepare for the installation:
       $ mkdir kannel
$ cd kannel
$ wget https://www.kannel.org/download/kannel-snapshot.tar.gz
$ chmod +x kannel-snapshot.tar.gz
$ tar -xzvf kannel-snapshot.tar.gz
4. Configuring Kannel:
Initiate the configuration process with the ./configure script, tailoring the setup to your system’s specifics. Common options include:
- MySQL Support:
--with-mysql=/usr/local/mysql - PostgreSQL Support:
--with-postgresql=/usr/local/pgsql - SSL Support:
--enable-ssl - Shared Libraries:
--enable-shared - Debugging:
--enable-debug - Installation Prefix:
--prefix=/usr/local/kannel
Explore all available options with ./configure --help to optimize your configuration.
5. Compilation and Installation:
Post-configuration, compile Kannel with make and proceed with sudo make install to install the software.
6. Configuring the Kannel Daemon:
Tailor the /etc/kannel/kannel.conf file to align with your specific SMSC settings.
7. Launching Kannel:
Bring your Kannel setup to life by starting the daemon with sudo kannel start.
8. Testing the Waters:
Verify your setup’s efficacy with Kannel’s sendsms or bearerbox command, ensuring everything is primed for operation.
With the server configured and Kannel at the ready, you’re well-equipped to delve into Open Source, home-made SMS communication.
Part 2: Setting Up the SMS Gateway
Hardware Configuration
Hardware Selection
For sending SMS messages, the hardware setup doesn’t need to be overly complicated. Here’s what you’ll need:
- GSM Modem/Gateway: A key component. You want something reliable and with good support for AT commands. Models from Sierra Wireless, Wavecom, or Huawei (like the E220) are popular choices.
- Server/Computer: To run Kannel. This doesn’t need to be beefy - a VM or a Raspberry Pi 4 or any decent PC will do the trick, provided it has enough USB ports (if connecting the modem directly) or network capacity.
- SIM Card: With a data plan. Choose a carrier that offers good coverage in your target areas to ensure the modem can connect to the network and send SMS messages.
Setting Up the Hardware
- Connect the GSM Modem: Plug the GSM modem into your server’s USB port or connect it to the network if you’re using an IP-based gateway.
- Install Modem Drivers: Ensure the operating system recognizes the modem. Linux tends to handle this well out of the box, but you might need specific drivers or configurations based on the modem model.
- Verify Modem Functionality: Before proceeding, make sure the modem can send and receive SMS messages normally. You can use tools like
minicomorscreenon Linux to interact directly with the modem using AT commands.
Integrating Hardware with Kannel
Once Kannel is installed and the hardware is set up, you need to integrate them by configuring Kannel to use your GSM modem as an SMSC.
-
Configure Kannel for the GSM Modem: Edit the
kannel.conffile to include a group definition for your modem. It’ll look something like this:group = smsc smsc = at smsc-id = MyModem device = /dev/ttyUSB0 speed = 115200Replace
/dev/ttyUSB0with the actual device your modem is recognized as. Thespeedparameter should match your modem’s specs. -
Testing Configuration: Use Kannel’s
sendsmsutility to send a test SMS and ensure everything is set up correctly.
Sending SMS via Kannel
To send SMS through Kannel, you generally interact with its HTTP interface.
Silent SMS?
Given the legal and ethical implications, we’d like to disadvice from trying such actions. At the same time we think it’s important to know for everyone, how easy it would be to do so, that it doesn’t require a state sponsored APT.
The “Silent Option” is one of the rare usecases that does make sense for SpecOps units, leaving the target unaware of what’s going on may be mission critical and save lifes in certain scenarios. Redteaming is definitely not a similar justification.
Kannel itself doesn’t directly support sending custom AT commands as a built-in feature because it abstracts away the modem-specific AT commands for standard operations. Given this, you have two main approaches, when you want to go stealth mode super spy, topping up your legal bill massively instead of just sending a fake SPAM SMS with no further legal consequences:
- Modify Kannel’s Source Code: Extend Kannel to support custom AT commands. This requires in-depth knowledge of Kannel’s architecture and C programming.
- Direct AT Commands to Modem: Use a separate script or program to send AT commands directly to the modem, bypassing Kannel for the specific task of sending a invisible SMS.
Since the second option is more straightforward and keeps your Kannel setup clean, let’s focus on that.
Direct AT Commands
- Connect to the Modem: Use a tool like
minicom,screen, orpicocomto interact with the GSM modem. Example forminicom:minicom -D /dev/ttyUSB0 - Send Invisible SMS AT Command: The specific AT command might vary by modem, but generally, you’ll use something like this:
This command format attempts to send a message without prompting the recipient’s device to alert the user. Note: Actual support forAT+CMGS="phone_number",0,,127^ZYour message herecustom ATcommands also depends on the network and the recipient’s device.
Capturing Response Data
To capture the acknowledgment or error response from the network when a SMS is sent, and potentially any network-level information related to the transmission, you can use network sniffing tools like wireshark, tshark, or tcpdump.
- Set Up Packet Capture: Run
tcpdumporwiresharkon the interface connected to the internet or mobile network. Fortcpdump:tcpdump -i any -w capture.pcap - Send the SMS: While the capture is running, send the SMS as described above.
- Analyze the Capture: Open the
.pcapfile with Wireshark. Look for any SMPP (if connected to an SMSC over the internet) or IP traffic related to your GSM modem’s connection for clues about the SMS delivery status and network responses.
Wireshark and Mapping
Wireshark can indeed help map IP addresses to geographic locations, leveraging external geolocation services. To see this in action:
- Open the
.pcapfile in Wireshark. - Find packets related to your SMS activity.
- Right-click a packet and select
Resolve Name->GeoIP->Map Destination(orMap Source, depending on what you’re investigating). This requires setup in Wireshark to use GeoIP databases.
Estimating Location from Cell Tower Data
Once you’ve captured the data indicating which cell tower was used for the SMS (either via network sniffing tools or logs from your GSM modem), you can use services like OpenCellID or maprad.io to estimate the device’s location.
Test Case Example
- Extract Cell Tower Info: Let’s say you identified the cell ID
12345and LAC678from your captured data. - Use OpenCellID: Go to OpenCellID.org, enter the cell ID and LAC, and it will return the approximate location of the cell tower.
- Maprad.io Approach: Similar to OpenCellID, input the data into maprad.io to get the location estimation.
Bonus: Hardware
When selecting GSM modems for custom AT commands, especially for use with Kannel on a Linux system, compatibility, ease of integration, and reliability are key factors. Given these requirements and considering the use cases we’re discussing, here are some GSM modem models that are well-regarded in the community for their performance, Linux compatibility, and general availability:
1. Huawei E220/E173
- Compatibility: Excellent compatibility with Linux; recognized out-of-the-box by most Linux distributions.
- Features: Supports a wide range of GSM frequencies and is capable of sending and receiving SMS and data connections (GPRS/EDGE/3G).
- Availability: Widely available on the second-hand market and new from some suppliers.
- Use Cases: Ideal for sending SMS messages, including
custom ATcommands, due to its ease of use and compatibility with AT commands.
2. Sierra Wireless AirLink Fastrack Xtend FXT009
- Compatibility: Known for good Linux support. Works well with standard serial port drivers.
- Features: Offers EDGE/GPRS connectivity and is highly reliable for SMS operations. It supports an external antenna for improved signal strength.
- Availability: Can be found through industrial suppliers or second-hand.
- Use Cases: Robust choice for professional or industrial applications where reliability is paramount.
3. Wavecom Fastrack Supreme
- Compatibility: High compatibility with Linux systems. Recognized via serial or USB interface.
- Features: Supports SMS, MMS, and GPRS. Known for its durability and extensive support for AT commands.
- Availability: Available from industrial telecommunications equipment suppliers and second-hand markets.
- Use Cases: Suitable for heavy-duty operations and where extended longevity is required.
4. Telit modems (Various Models)
- Compatibility: Good Linux support. Telit provides comprehensive technical documentation to assist with integration.
- Features: Wide range of models covering 2G, 3G, 4G, and even LTE capabilities. Supports GPS/GNSS in some models, which could be beneficial for location-based applications.
- Availability: Broadly available through both direct sales channels and resellers.
- Use Cases: Offers flexibility for projects that might expand into data or need precise location tracking in the future.
Considerations:
- Driver Support: Linux compatibility often means good driver support and community resources for troubleshooting. All listed models have a history of good Linux support.
- AT Command Set: Ensure the modem supports an extensive AT command set, which is necessary for
custom ATcommands or performing any form of advanced messaging control. - Network Compatibility: Check the GSM frequencies supported by the modem against those used by your target network operators to ensure compatibility.
- Supply Chain: Given the varying availability, especially for models that may no longer be in production, consider the supply chain and potential need for bulk purchases in the future.
When choosing a modem, it’s also wise to purchase one unit first for testing to confirm compatibility with your specific Linux setup and use case. This approach helps avoid any unforeseen issues before scaling up your hardware acquisition.