Published
- 7 min read
Flashing Kali Nethunter on a Pixel 4a
This article and practical work was done entirely by our Trainee. We only provided the article image.
Unlocking Bootloader
It is best to use a new phone or a phone you dont need anymore, with its data backed up, because all the data will get deleted when we unlock the Bootloader.
First we are going to go into Settings > About phone, scroll down and tap the Build number 7 times to enable developer mode.
Then we are going to Settings > System > Developer options and enable the option OEM unlocking
After that we shut the phone down.
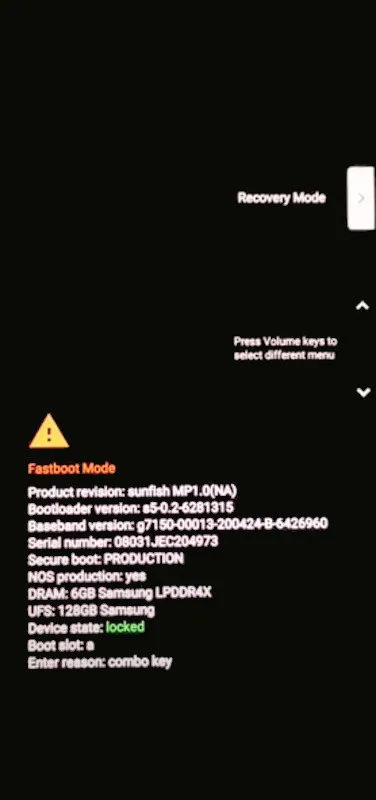
Now we hold the volume down button + the power button, till this screen appears:
Now we are going to plug the phone into our PC via USB.
Check your Device manager, the phone will probably show up under other devices, if you dont already have a Google USB Driver installed.
Here is the newest Google USB Driver for Windows 10: https://developer.android.com/studio/run/win-usb
After downloading and unziping the file we go to Device Manager again and to our Pixel 4a. We right click it and select properties, we go to the Drivers tab and and click update drivers.
We do Search for drivers on my computer and select the unziped Google USB Driver folder. This should update the drivers for the Pixel 4a and now show it under Android Device.
Now we can finally unlock the Bootloader. Here is the download for the tools we will need: https://developer.android.com/tools/releases/platform-tools
We download the file, unzip it, Then we open up a cmd shell and go to the folder.
Here we do:
       C:\Users\kali\Downloads\platform-tools> ./fastboot flashing unlock
OKAY [  0.262s]
Finished. Total time: 0.264s
Now on the phone it will ask us if we want to unlock the bootloader. We press volume down and then hit the power button.
The screen will go black for a bit than back to the Fasboot screen, but the Device state should now be unlocked.
We just press the power button again and our phone will boot up, it will take a bit longer than normal and we get a warning but after the phone is finished booting up we have an unlocked Bootloader!
Rooting the phone
After unlocking the bootloader you need to find the current build number - go to Android Settings - About this Phone - Scroll to bottom - it should look something like: TQ3A.2308005.001.S1.
Then you need to visit https://developers.google.com/android/images and search the site for that build number, click on the link button to download it.
Next you’ll need to unzip the folder and search for the boot.img file, sometimes theres a .zip in the zipped folder so you’ll have to search in that too.
After finding the file, extract it to a folder on your phone.
Now you will need to install the official Magisk app on your phone, to do that, just download and install the newest apk from Github: https://github.com/topjohnwu/Magisk/releases
You can then use the Magisk app to patch the boot image, open Magisk and select “Install” then “Select and Patch a File” and select the boot.img file you extracted earlier. The newly created file will be named something like this: magisk_patched-28100_jKdgE.img, copy it to your pc.
Open the platform-tools again and use fastboot to check for the phone (phone should of course be connected with the PC):
       PS C:\Users\kali\platform-tools> ./fastboot devices
11071JEC209997   fastboot
Next you’ll have to boot the phone into fastboot mode, this can be done by restarting your phone and holding down the volume down button. Then use the following command to flash the root image and reboot:
       C:\Users\kali\Downloads\platform-tools> fastboot flash boot C:\Users\C:\Users\kali\pixel4a\magisk_patched-28100_jKdgE.img
Sending 'boot_a' (65536 KB)                        OKAY [  1.705s]
Writing 'boot_a'                                   OKAY [  0.286s]
Finished. Total time: 2.403s

C:\Users\kali\Downloads\platform-tools> fastboot reboot
Rebooting                                          OKAY [  0.045s]
Finished. Total time: 0.052s
To check if your device is rooted, you can use an app like Root Checker or just try to access the Super User section in Magisk. If your able to access it, then your device is rooted.
Installing Nethunter
You should now install the Nethunter Store: https://store.nethunter.com/ On the Store install: Nethunter + Nethunter Terminal After giving them root you can now finally install Nethunter in the Nethunter app and have your own Nethunter Phone!
Troubleshooting
Looks like you’ve successfully flashed a Magisk-patched boot image to your Pixel 4a, but your root check didn’t turn up as expected. Let’s troubleshoot:
-
Magisk Manager App: Ensure you’ve got the Magisk Manager (or Magisk app if it’s been updated) installed. This app is crucial for managing root access and might need to be manually installed after flashing the patched boot image.
-
Correct Boot Slot: The Pixel 4a, like many modern Android devices, uses A/B partitioning for seamless updates. It’s possible the root was applied to one slot (say, slot A), but your phone booted from the other slot (slot B) where the original, unpatched boot image resides. Check which slot your device is currently active on:
- Reboot into fastboot mode (
adb reboot bootloaderor use the hardware key combination). - Use the command
fastboot getvar allto check the current active slot. - If needed, you can switch the active slot via
fastboot --set-active=[a/b]and then reboot.
- Reboot into fastboot mode (
-
Re-flashing Process: It’s also a possibility that the flashing process didn’t go as expected. Double-check the commands and ensure that the file paths are correct. Since you’ve already flashed it once, it wouldn’t hurt to attempt the process again, carefully following each step.
-
Magisk Patched Image: Verify that the Magisk-patched boot image (magisk_patched-22100_z85V3.img) is the correct one for your device and firmware version. Using an incompatible image can result in unsuccessful rooting.
-
ADB and Fastboot: Make sure you’re using the latest version of ADB and Fastboot tools. Outdated versions can sometimes cause unexpected behavior during the flashing process.
-
Check for Errors: Look out for any errors during the boot process that might indicate a problem. Sometimes, the device might provide feedback through recovery mode if the boot process wasn’t successful.
-
SafetyNet Check: If you have the Magisk Manager installed, run a SafetyNet check. It’s possible to have root without passing SafetyNet, but failing SafetyNet can also indicate issues with how root was achieved.
If none of these steps resolve the issue, consider revisiting the Magisk installation guide specific to your device model and Android version, as there might be device-specific instructions or requirements that were overlooked. At the end I also want to note that updating Magisk will remove root access and you’ll have to re-root your phone again.
Unbricking your phone
If you followed some other tutorial and are now stuck at an infinite Google loading screen/Bootloop, don’t worry, we got you covered. Here’s a method to try unbrick your device:
First we’ll have to revisit the platform-tools and the offical Image for your phone, in the original image .zip we downloaded we’ll need to search for these files and extract them to another folder:
       boot.img
system.img
vendor.img
vbmeta.img
After that, we’ll have to flash the images using fastboot, but first we need to enter fastboot mode, so reboot your phone and press Volume Down until you see the fastboot screen, now connect your phone to PC and open platform-tools folder and type these commands:
       PS C:\Users\kali\Downloads\platform-tools> ./fastboot flash boot C:\Users\kali\pixel4a\boot.img
PS C:\Users\kali\Downloads\platform-tools> ./fastboot flash system C:\Users\kali\pixel4a\system.img
PS C:\Users\kali\Downloads\platform-tools> ./fastboot flash vendor C:\Users\kali\pixel4a\vendor.img
PS C:\Users\kali\Downloads\platform-tools> ./fastboot --disable-verity --disable-verification flash vbmeta C:\Users\kali\pixel4a\vbmeta.img
PS C:\Users\kali\Downloads\platform-tools> ./fastboot reboot
It can happen that you get this error:
       Sending sparse 'system_a' 1/4 (262112 KB)          OKAY [  6.530s]
Writing 'system_a'                                 FAILED (remote: 'Partition should be flashed in fastbootd')
fastboot: error: Command failed
If that happens, you’ll need to enter fastbootD Mode, verify the connection and then try to flash the system_a:
       PS C:\Users\kali\platform-tools> ./fastboot reboot fastboot
PS C:\Users\kali\platform-tools> ./fastboot devices
PS C:\Users\kali\platform-tools> ./fastboot flash system_a C:\Users\kali\pixel4a\system.img
PS C:\Users\kali\platform-tools> ./fastboot reboot
This should now give you the original unrooted phone again, but all your data should still be intact. Make a backup before trying to get root again!